Category Archives: Boardgames

Return To Kernstown

The post’s title evokes images of a Hallmark special movie.

Not really.  This return was a slasher movie bloodbath, attributable for the most part to my ham fisted re-entry into the Great Battles of the American Civil War (GBACW) system.

This is/was my first home board game after the re-organization and re-direction of collection.  The upshot of all that summertime thrashing was to establish a focus on several series of games, rather than any number of one-offs.  The emphasis now is on play, not reading a new set of rules, stumbling through a couple of plays, and then moving on to something else.  Sure, there are several magazine and specific games that I want to and will play, but this new emphasis increases time spent moving counters.

These GBACW games are part of the first series as published by SPI and others, before the revamping rolled out  by GMT. The new rules  seemed far more involved, without a commensurate increase in enjoyment.

So, the decision was made to fill out my collection, and start in on the cycle, using the last iteration of the SPI rules but ignoring, for now,  options and artillery overshoot (ugh).  I relied not only on that set of rules, but also the wonderful GBACW resources developed and published by Russell Gifford over at Boardgamegeek.

Just like Hollywood, my sequel unfolded much like its predecessor.  The Confederates used their cavalry to pin the Union 2nd Brigade, while their three infantry brigades with attached artillery attempted to skirt the Union positions either to flank them and attack, or exit the map.  If successful, either of these approaches would result in a decisive Confederate victory.

This flanking maneuver soon became a fire fight that degenerated into a nobody is moving an inch brawl.

I enjoy the chaos of this game system.  Probably the real Loki of the system is the Ammunition Depletion rule.  If a firing unit roles a “1”, it must check for ammunition depletion.  If that subsequent roll is a “1” or “2”, the unit cannot fire during either the defensive or offensive fire phase until resupplied.  In Kernstown, the Confederates cannot be resupplied.

Here’s an example of the fun.

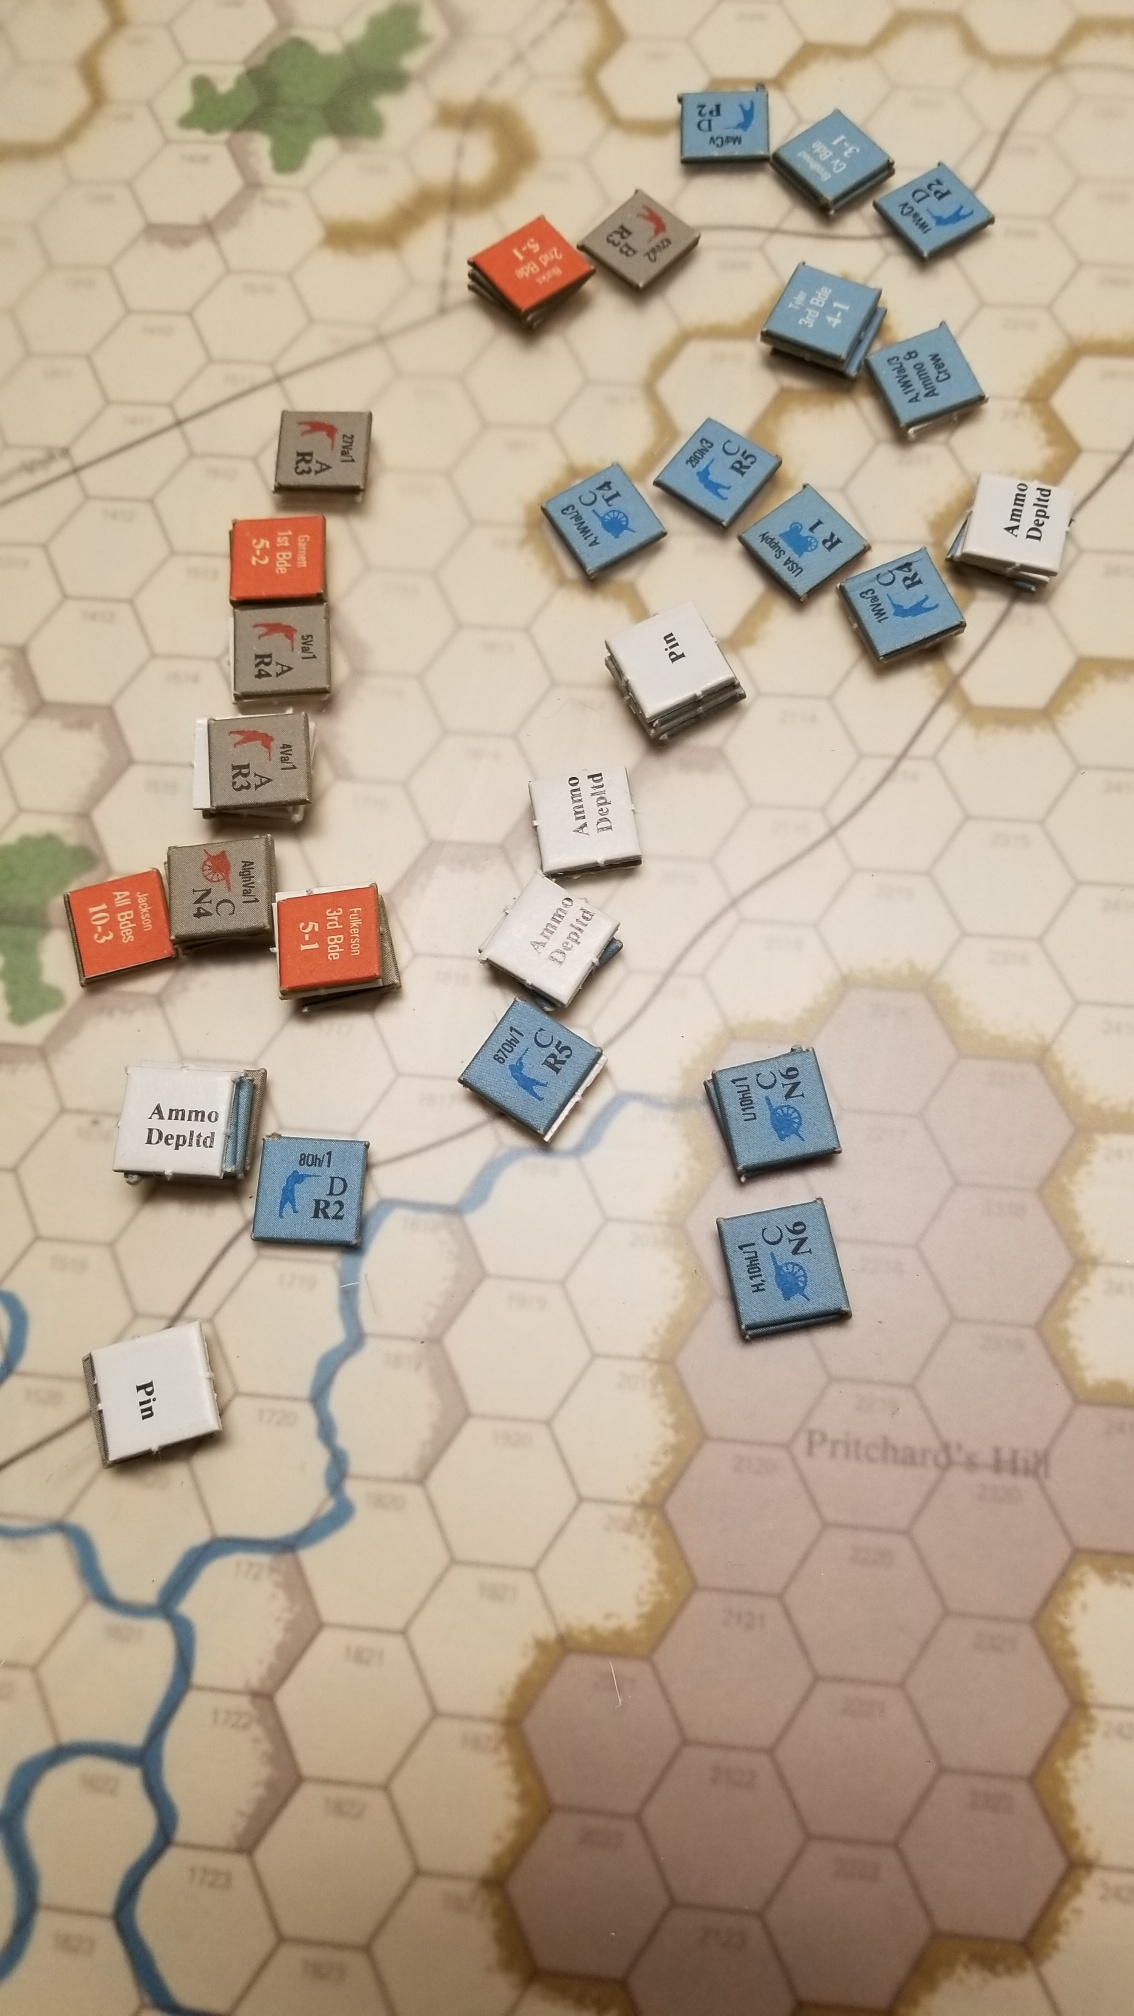
With four turns left, the Union has five units ready to vaporized Brigadier Fulkerson and the remnants of his brigade,  and then fall on the exposed Confederate flank.  What happened?  Three of the five offensive fire rolls were “1”, with each of the succeeding rolls being either a “1” or “2”.  No “Blammo!!!”***

Despite the general mutual slaughter, the Confederates were able to grab critical Victory Points (VIPs) through Federal sloppiness in dealing with exiting cavalry units, and the Union garnered VIPs by maintaining morale and holding their initial positions.  The result was a draw.

I’m looking forward to playing Volume II, Pea Ridge!

*** The Word Tim B (Friend and Wargaming Opponent Extraordinaire) blurts out when an an enemy stack or unit is eliminated.  Adorable.

It Gets Serious: May II Turn

These screenshots summarize the May II Turn.


German armor sweeps past the weak ad-hoc French defenses and advances towards the Marne.  Also, the German commander turns loose “Ants” to disrupt the Allied rear areas.  To the north, German forces grind up the Dutch and Belgians,  advancing to the Dyle Line.

The Allies rush armored/mechanized units to contain the Ardennes penetration, while withdrawing from the Dyle line, using Belgian forces in support.  The Dutch attempt to consolidate their defense in order to tie down German forces for as long as possible.

Painful. But It Must Be Done! Fall of France Through May I Turn

I’ve bitched about my Fall of France (FoF) game with Tim, but I am now compelled to report it.

As usual with this site, the graphics will be less than ideal, a condition due in equal parts to my ambivalence towards pushing the boundaries of computer literacy and reliving a wargaming hell.

I was able to figure out how to get screenshots on my ancient Dell Windows 8 machine.  However, the screen shots of the JET board are just that; a shot of what is on the screen.  The JET mapboard takes up more than the screen, so the graphic evidence of this debacle will be from north of Frankfurt.  That’s  OK, because that it is where most of the carnage occured and is continuing to occur. We are now in the Allies Jun II turn, and things are looking very grim for the Allies.  But….. we must start at the beginning.

The Germans have  extremely powerful air and ground units.  The screenshots show only the top unit in the hex.  But, below that scary surface, lies even more panzer divisions, supported by motorized units, lots of motorized flak and artillery.

One revelation was how tough the German infantry stacks were.  Three 8-8 infantry, paired with artillery represents a lot of combat power.

Allied units are solid, but lack  mobility, flak and supporting units.I shudder when I think about the German’s powerful ground attack air assets used to support these armored and infantry forces.

Then, there are the historically based operational rules.  They create a difficult framework for the Allies to work within.

The Germans start off with an invasion turn, which includes all normal Europa turn phases except the exploitation phase.

The Allies do have a reaction phase. However, this is scripted because most northern French units and those of the BEF must enter Belgium  to occupy the Dyle River Line, setting up the historical “Sickle Cut”.

While Dutch and Belgian units can move during this Allied reaction phase, they cannot enter enemy zones of control.

With the Allies sucked into Belgium, the Germans start the regular  May I  turn.During the Allied player May I turn,  no unit in an enemy ZOC (Zone of Control) can move, and all British or French units have their movement factors halved.

The Allies are further hampered by the inability of their combat / motorized units to attack a full-strength or move using full movement during their exploitation phase until the beginning of the June I turn.   This reflects a lack of mechanized doctrine.

To make things even worse, during the May I turn any French  non-mech/motorized unit has to retreat two hexes rather than one if it has fought  an attacking German force with at least one panzer division.

One other note about the graphics.  As I mentioned, JET is a real marvel.  However, it cannot do several things within the rules as written Europa framework.  The result is that you have to tweak things, and the file you forward may have a heading (found in the upper left hand corner of the screen) that isn’t quite accurate.  An example:  You cannot fly CAP (Combat Air Patrol) during the Initial Phase.  You have to cheat, and “fool” the machine by forwarding to your Movement Phase, where it is allowed.  So, on the files shown, the heading on the screen may show “German Movement Phase”, when in fact the file really reflects the Allied Initial Phase.  Confused….good…..misery needs company…..and  the weight of Tim’s advance has had me in a daze since early May.

Allied Setup
Allied Exploit – Move To The Dyle Line
You can see the German penetration through the Ardennes.  Now, the Allies must avoid being enveloped.  Will post up later with more carnage….after I do a better job of figuring out the screen shot sequence.

Byzantium Reborn Review

This “mini-game” published by Fiery Dragon covers the 1920-21 fighting between Greece and Turkey.  The game was originally published by Micro Game Design Group.  Here’s link to the BGG page:  https://boardgamegeek.com/boardgame/13290/byzantium-reborn

This interesting R. Ben Madison design  lends itself to solitaire play.  Small footprint, not many counters, but real breadth to the rules.  Well, maybe not breadth as much as layers of chrome.  But it is good chrome.  The examples of play are done in a narrative style.  I prefer procedural examples.

It is a different type of system, and although the rules are laid out in game turn squence, there is quite a bit of page flipping early on to get comfortable with terminology, minor pieces of chrome, and general game flow.

The game isn’t as much about combat, but resource and allies management.  Combat is a means to increase your resources through occupying regions (Vilayets), but the real challenge is to gain allies that will intervene in the conflict and/or deny your opponent this support.  Your allies provide Equipment Points (EPs) used for the purchase of combat units/assets.

Each turn consists of a Random Events Phase, Political Phase, Greek Player Phase – which includes Battlegroup Step, Strategic Movement Step, Movement Step, Combat Step and Recovery Step.  There is a Second Random Events Phase, Strategic Phase, and then the Turkish Player Phase, which repeats the Greek Player’s steps.

Random events influence potential Ally behavior and the ability to gain/lose Political Support Points (PSPs) and EPs.  During the Political Phase, players can expend PSPs to “buy” increased support, or reduce their opponents political support.  Again, this support influences the ability to gain EPs which can be used to build or rebuild ground units, or bid for Asset Points (APs), represented by air and artillery units which serve as force multipliers during combat.

This purchase of APs is done on a bidding basis which I initally had trouble with. Likewise, the increased allocation of PSPs can be used to enhance the chances of moving one of the European powers involved in the conflict (Italy, Great Britain, France, Soviet Union and, to a much lesser extent, The United States), from Neutrality to Support and finally to Intervention.  Support and Intervention generate different levels of EPs 

The Battlegroup step is simply organizing one’s forces for combat in each of the Vilayets (regions) controlled.  Strategic movement involves rail or naval movement, and Movement is between Vilayets to either occupy for resources or to set up combats.  Combat is a dice fest, without the use of a Combat Results Table (CRT).  The Recovery step involves rallying unit disrupted in combat.

As pointed out in an earlier review, the game does involve a significant amount of luck, as embodied in the Random Events table.  But, the events are based on historical actions or probabilities/possibilities, and for solitaire play that’s not a bad thing.

As you might sense from my description of the game, it took some time to grasp the differences between PSPs, APs, and EPs as well as the methods for their use.  The bidding for assets and use of dice for combat also involved a learning curve.

However, the effort was worth it.  This is a good game, with an interesting system, that provides an enjoyable gaming experience.  

Here’s a picture of it on a card table.  Gives a sense of size.

Pursuit of Glory AAR

Finished up a weekend session with Tim.  We made it to Summer 1917 (I think), and then packed it up.  While my Central Powers armies were not defeated, we certainly weren’t in good shape.

For some reason, I couldn’t get the Caucasus Theater figured out, and Tim’s Russians were able to grab some crucial victory points, stalling the Russian Revolution.  That event is critical for the Central Powers’ fortunes, as it will knock Russia out of the war, and the Ottoman Empire’s dwindling resources can be used to  stop the British Empire.

The Empire got off to a good start Its naval units ran the gauntlet of forts guarding the approaches to Constantinople, destroyed them and even bombarded the city.  Tim followed this success up with a landing,  and prevailed in a long series of battles in and around Gallipoli.

Although I was able to knock Serbia out of the war, and open a rail connection to Germany’s resources, I couldn’t capitalize on this success, or maintain any pressure along the eastern periphery of the British Empire.  My revolts in Persia and approaches to Afghanistan never amounted to much, and Tim was able to deploy sufficient Russian units to turn that into a strategic cul-de-sac.

Here’s a quick situation picture before the wheels started coming off.

By the way, although he and I have played the game several times, I’ve never posted up about it.  Here’s a link to this highly regarded game’s  page.


Don’t Want To Look

Playing Fall of France (it’s that time of year) with Tim using Jet (JET?) software.  He finally talked me into it after years of cajoling.

Jet is quite an accomplishment.  While the graphics are rudimentary, and the program has its quirks, in the final analysis it is quite an accomplishment.  I marvel at how it eliminates much of the cardboard and paper drudgery.

I have the results of his German May II combats downloaded to the computer, but I can’t open it.  I’m playing the French side.  I have gained new insights as to how General Gamelin must have felt.  Nothing but bad news.  Wake up in the morning, look at the situation map and go right back to bed.  I almost did that last week after I received his May I turn combats.

I feel the same way about opening this file as I do when I hear a loud 3 AM Thump downstairs.  I would prefer not to investigate and am loathe to get the shotgun.

What makes it worse is that his well intended informational snippets contained in the body of the email are, to me, not informational but loaded with ill portent.

This apprehension  is so acute that I promised to watch a movie with my Wife this evening………


Another New System

The Sun Never Sets (TSNS) has been languishing on the shelf for a number of years. Tried its Gallic Brother In Arms – French Foreign Legion – a few years back, but that effort didn’t even make it to the punch counters phase.

Some 45 Minutes later……

Did some quick checking and there are a number of games in this series. Not only French Foreign Legion, but also The Sun Never Sets II and First Afghan War. Each of the games was published in Strategy & Tactics magazine. After rummaging through  boxes stashed under the gaming table, I discovered the latter two. So, I have the entire set. At times like this I feel like an aging acid-addled rock star who, when an interviewer plays an obscure track, mutters “Did I play on that”?

To continue this digression, I’m now faced with a standard gaming conundrum. Since I’m immersed in the common rule set, do I start working through the entire set of games? Or, will this only result in a feeling of obligation and avoidance, with a yearning to try something else?

TSNS has an interesting system. It can’t be considered a hex and counter simulation, but it has more depth than initially meets the eye. The campaigns covered appear to be push-overs for the British Empire. But distances, logistics and objectives can make each campaign a challenge.

Units are categorized by weapon type and morale. Weapons include five different types of artillery (rockets!), two types of machine guns, and four different types of rifles. For morale, units are classified as Veteran, Line, Fanatic and Rabble. The first three receive positive die roll modifications for both fire and melee combat.

Individual units can be organized into Forces. Headquarters (Leaders) can be assigned to Forces. A Headquarters has a tactical rating effecting Battle (combat) and Rally, with a strategic rating influencing Movement. Larger forces have a greater combat strength, which is reflected in the Combat Results Table (CRT). Force organization also effects Logistics.

The basic turn sequence is straight-forward, even though I’ve had some real problems keeping the mechanics straight. These Turn Segments are:

  1. Events
  2. Reinforcement/Replacement
  3. Movement
  4. Battle
  5. Logistics
  6. Rally

Events are randomly generated by 2xD6 rolls applied to a chart. Some results are campaign specific, others generic for the colonial period. Reinforcements and Replacements are game specific and involve either the deployment of specific units or strength factors by unit type.

While movement rates are printed on the counters, the ability to move and length of move is determined by a D6 roll for each Force at the beginning of the segment. Possibilities include no movement allowed, regular movement, forced march with an increased movement allowance, forced march with attrition (elimination of one unit in the force) and “Mad Dash” with even greater maximum movement. A Headquarter’s strategic rating may be added to modify the die roll.

The Battle Segment is somewhat involved. Tactical Initiative (comparing each side’s D6 roll modified by tactical rating of the Headquarters) determines which side proceeds first. This is important since results are applied immediately. Battle has three rounds, two of which involve fire combat. The third round is melee. During fire combat, units with the same morale rating, weapon and unit type are grouped to fire a “Volley”. Artillery fires during the first round, with rifles (all small arms) during the second round. Many native units do not have small arms, and can only “volley” during melee combat. Units with small arms also “volley” during melee. Specific modifiers are applied to the D6 rolls for results on a CRT specifying the number of units eliminated and/or demoralized. The side with the greater losses during a Battle may have to retreat if those losses exceed fifty percent. Forces retreating through an enemy controlled Zone of Control take additional losses.

Forces are supported by either Supply Trains or Foraging. Foraging Forces must roll to determine if they suffer demoralization. Supply Trains are expended after providing support. The number of trains is limited, and their staging/sequencing is important for a steady advance with minimal attrition.

Demoralized Forces may Rally. The ability to rally is influenced by their morale and Headquarters.

I’ve started the March To Peking scenario, covering the 1860 Arrow War. The basic game and scenario specific rules have provided a good experience, and after a number of fits and starts I am getting comfortable with the game’s flow.

I am looking forward to incorporating the optional rules in this and other scenarios. These include Engineering operations, Sieges, Fog of War, Attack From March, Ambush, Evasion, Atrocity and Fair Play, Negotiations, and Civillians.

My next post will offer an After Action Report (AAR).

No Wonder It Seemed So Easy…….

Finally got around to continuing my play of  Romania – The Transylvania Gambit. 

As previously posted, the Romania Army’s plan was badly flawed, and the scenario certainly reflects that.   The availability of German reinforcements to bolster the Austro-Hungarians effectively stops any offensive across the Carpathians.

Despite the slow operational tempo of mountain fighting and Romania’s desperate-from-the-start prospects,  I was settling down for another session when a  casual glance at the rule book moved the game from the possibly forgettable to another memorable rules gaffe.

Tim’s been on me to compile and post a list of our grotesque errors of rules omissions and commissions.  I have consistently demurred.  Not out of personal shame, but because the compilation would be a very lengthy and time consuming process.  So Tim, here’s one in real time.

All those German reinforcements hustled south using the Austro-Hungarian rail network, which has a capacity of three units per turn phase.  It took a few phases, but the Romanian attacks were quickly blunted.  Well, that was too quickly.  While the entire rail capacity is three units, the capacity for any one rail line in that network is only one unit per phase.  Whoops………..

The poor Romanians were not only fighting a flawed initial deployment and the mountainous terrain, but also some very tough units that should not have been there – at least not so quickly.

Well, that put paid to the game.  It was going to be some time before the  operational tempo accelerated past “slog” speed, especially with Winter just around the turn track corner.  My current impatience is not the best mood to enjoy a scenario which accurately represents the time and resources required to build up combat power in this theater of operations.

So, despite my high regard for the system, I decided to pack it up, and move on to another game.

Here’s a photo taken right before it all went back in the box.  Note all those gray German units in the North Central portion of the map.


Islamic State – Libya War

This  game is published by One Small Step Games (OSS) in  Counterfact Magazine.  I downloaded it from Wargame Vault.  It is solitaire, the contemporary topic is of some interest, and the format seemed to lend itself to download and DTP construction. The forum section of the game’s  Boardgamegeek page is essential reading as are the revised rules found at OSS’s game page.

The map printed out fine and looks good.  The counters were difficult to cut because the colors of the various factions’ units are similar shades of drab and lack visible guide lines.  The result was a grotesque lack of uniformity.  I decided to use Risk blocks in lieu of some of the counters/chits.  This improved appearances.

The game’s topic is the war against Daesh in Libya.  Allied forces are tasked with controlling key cities and oil fields as portrayed on the point-to-point map.   Each of the game’s eight turns is broken down into five (or six based on a turn-end roll), IGO-UGO action rounds.  Victory is determined by how many areas Daesh controls, number of active leaders, negative press coverage (due to collateral damage) received by the Allies, and hostages and downed pilots executed.

Allied forces can perform any one of several actions during their phase.  These are conventional unit movement into a Daesh controlled hex which triggers combat, “snatch and grab” operations using special forces to seize Daesh leaders for interrogation  or hostages, landing (amphibious) operations, heli-borne assault, reconnaissance, and strike missions with aircraft.

Daesh actions are generated using a table listing ten possible actions including kidnapping, terrorist attacks, and sabotage.

Combat is performed on a display arraying  Allied units against a Daesh counterpart randomly drawn from the Daesh force pool.   Each Allied unit can be supported by aviation, drone or artillery assets.  Allied forces never eliminate their opponents.  A positive combat result will have the Daesh unit ineligible to be activated again during the current turn, or unable to return to the Daesh unit pool until after the next game turn.  Intelligence concerning the whereabouts of hostages or Daesh leaders can also  result from combat.  Any Daesh force that survives an attack  “fires back” at their opponent and, in certain situations there is a combat modifier due to special weaponry. These units are returned to the force pool.

Here’s an imaginatively framed shot of the game in-progress.

I used traditional blue and red blocks to identify friendly and Daesh controlled areas instead of counters.  At bottom right is the combat display.  Both types of Allied units (combat on top and support at bottom) can fire at Daesh units.  The Allied force pools are located above the combat display.  The red lozenges are for Daesh leaders.  I substituted pink blocks for the hostage counters, blue lozenges for pilots and a yellow block for media.  These were placed on a hand scribbled holding area card, which also had the turn phase track.  Daesh victory points were tracked by a red block, allied casualties by a blue block and collateral damage by a black block.  Turns were marked with another green block, along with stacks of destroyed Daesh counters by a result calling for their re-entry to the force pool sometime later in the game.   The containers were used to hold conventional Allied units not on the map, and the Daesh force pool.  Support units can be used only once per game turn.  In the absence of specific guidance I treated parachute and special forces units as support units since it would take some time to re-brief, re-organize these types of specialized units.

The rules were criticized in a now-deleted post over at Boardgamegeek.  I would say that the layout could be better, perhaps more along the lines of the solitaire Destruction of Force Z, which presented the rules and, most importantly, charts in  game turn sequence.  After flipping back and forth between Islamic State’s eight pages, I did a cut-and-paste to reduce the rules to a manageable, more sequential  and flippable four pages.  Unlike the redacted reviewer, I cannot see playing the game in 60 minutes or less.  Not a bad thing, but there are  too many moving parts. Still, the pace is brisk with plenty of decisions and actions in every turn.

In my game the  Allies lost by Turn 5, probably due to my misreading of the collateral damage rules.  The Combat rules section indicates that collateral damage should be checked after combat – but is that individual combat or turn phase combat?  The Collateral Damage table indicates after all turn phase combats have been completed.  The latter significantly reduces the potential point gain for Daesh.

I enjoyed the game, and don’t regret the cost of purchase, time taken to construct the components, and understand the rules.  It is an intriguing system.  For me, on a cost-benefit basis, the returns on investment seem marginal.  I don’t imagine replaying it right now, or in the near future.  For someone else, this might be a go-to game, but not for me.