Category Archives: Sessions

Wavell’s War – East Africa Campaign

Tim arrived early Friday evening, just in time for the Stanford football game.  I had the table set up and ready to go.  We agreed to start playing early Saturday morning.  Tim took the British (Allies) and I had the Italians (Axis) forces.  The plan was an ambitious one.  To play the entire scenario, and watch as many of the headline college football games as possible.  Oh yes….and consume many Henry’s.  This was a job for professionals.

The Italians face some serious operational challenges.  They are considered Out of Supply (Status 4) from the beginning of the game.  Attack strength is quartered, defense and movement halved, with reduced Zones of Control (ZOC).  They have no General Supply sources, and must rely on a limited number of Attack Supply factors to create either General Supply Points, or use for attacks.  Italian Colonial troops (which form the bulk of their forces) can have air support only if it involves ten regiments (REs).  Air units must role on the Success Table to fly a mission, unless they are in General Supply.  If not, they can be aborted, or fail to fly.  To top it off, Italian movement is limited until the British enter Italian East Africa.

The British commander has his own problems involving time and space.  Time is critical because the Order of Battle (OB) requires two divisions have to be withdrawn by early summer.  The distances in the game are significant, and by Spring, the possibility exists that roads and terrain key areas will be reduced to muddy morasses, limiting movement and effecting combat.

Play started at 0830 with Game Day as background ambiance.  Here’s a summary of play.

Dec I 1940 – Clear

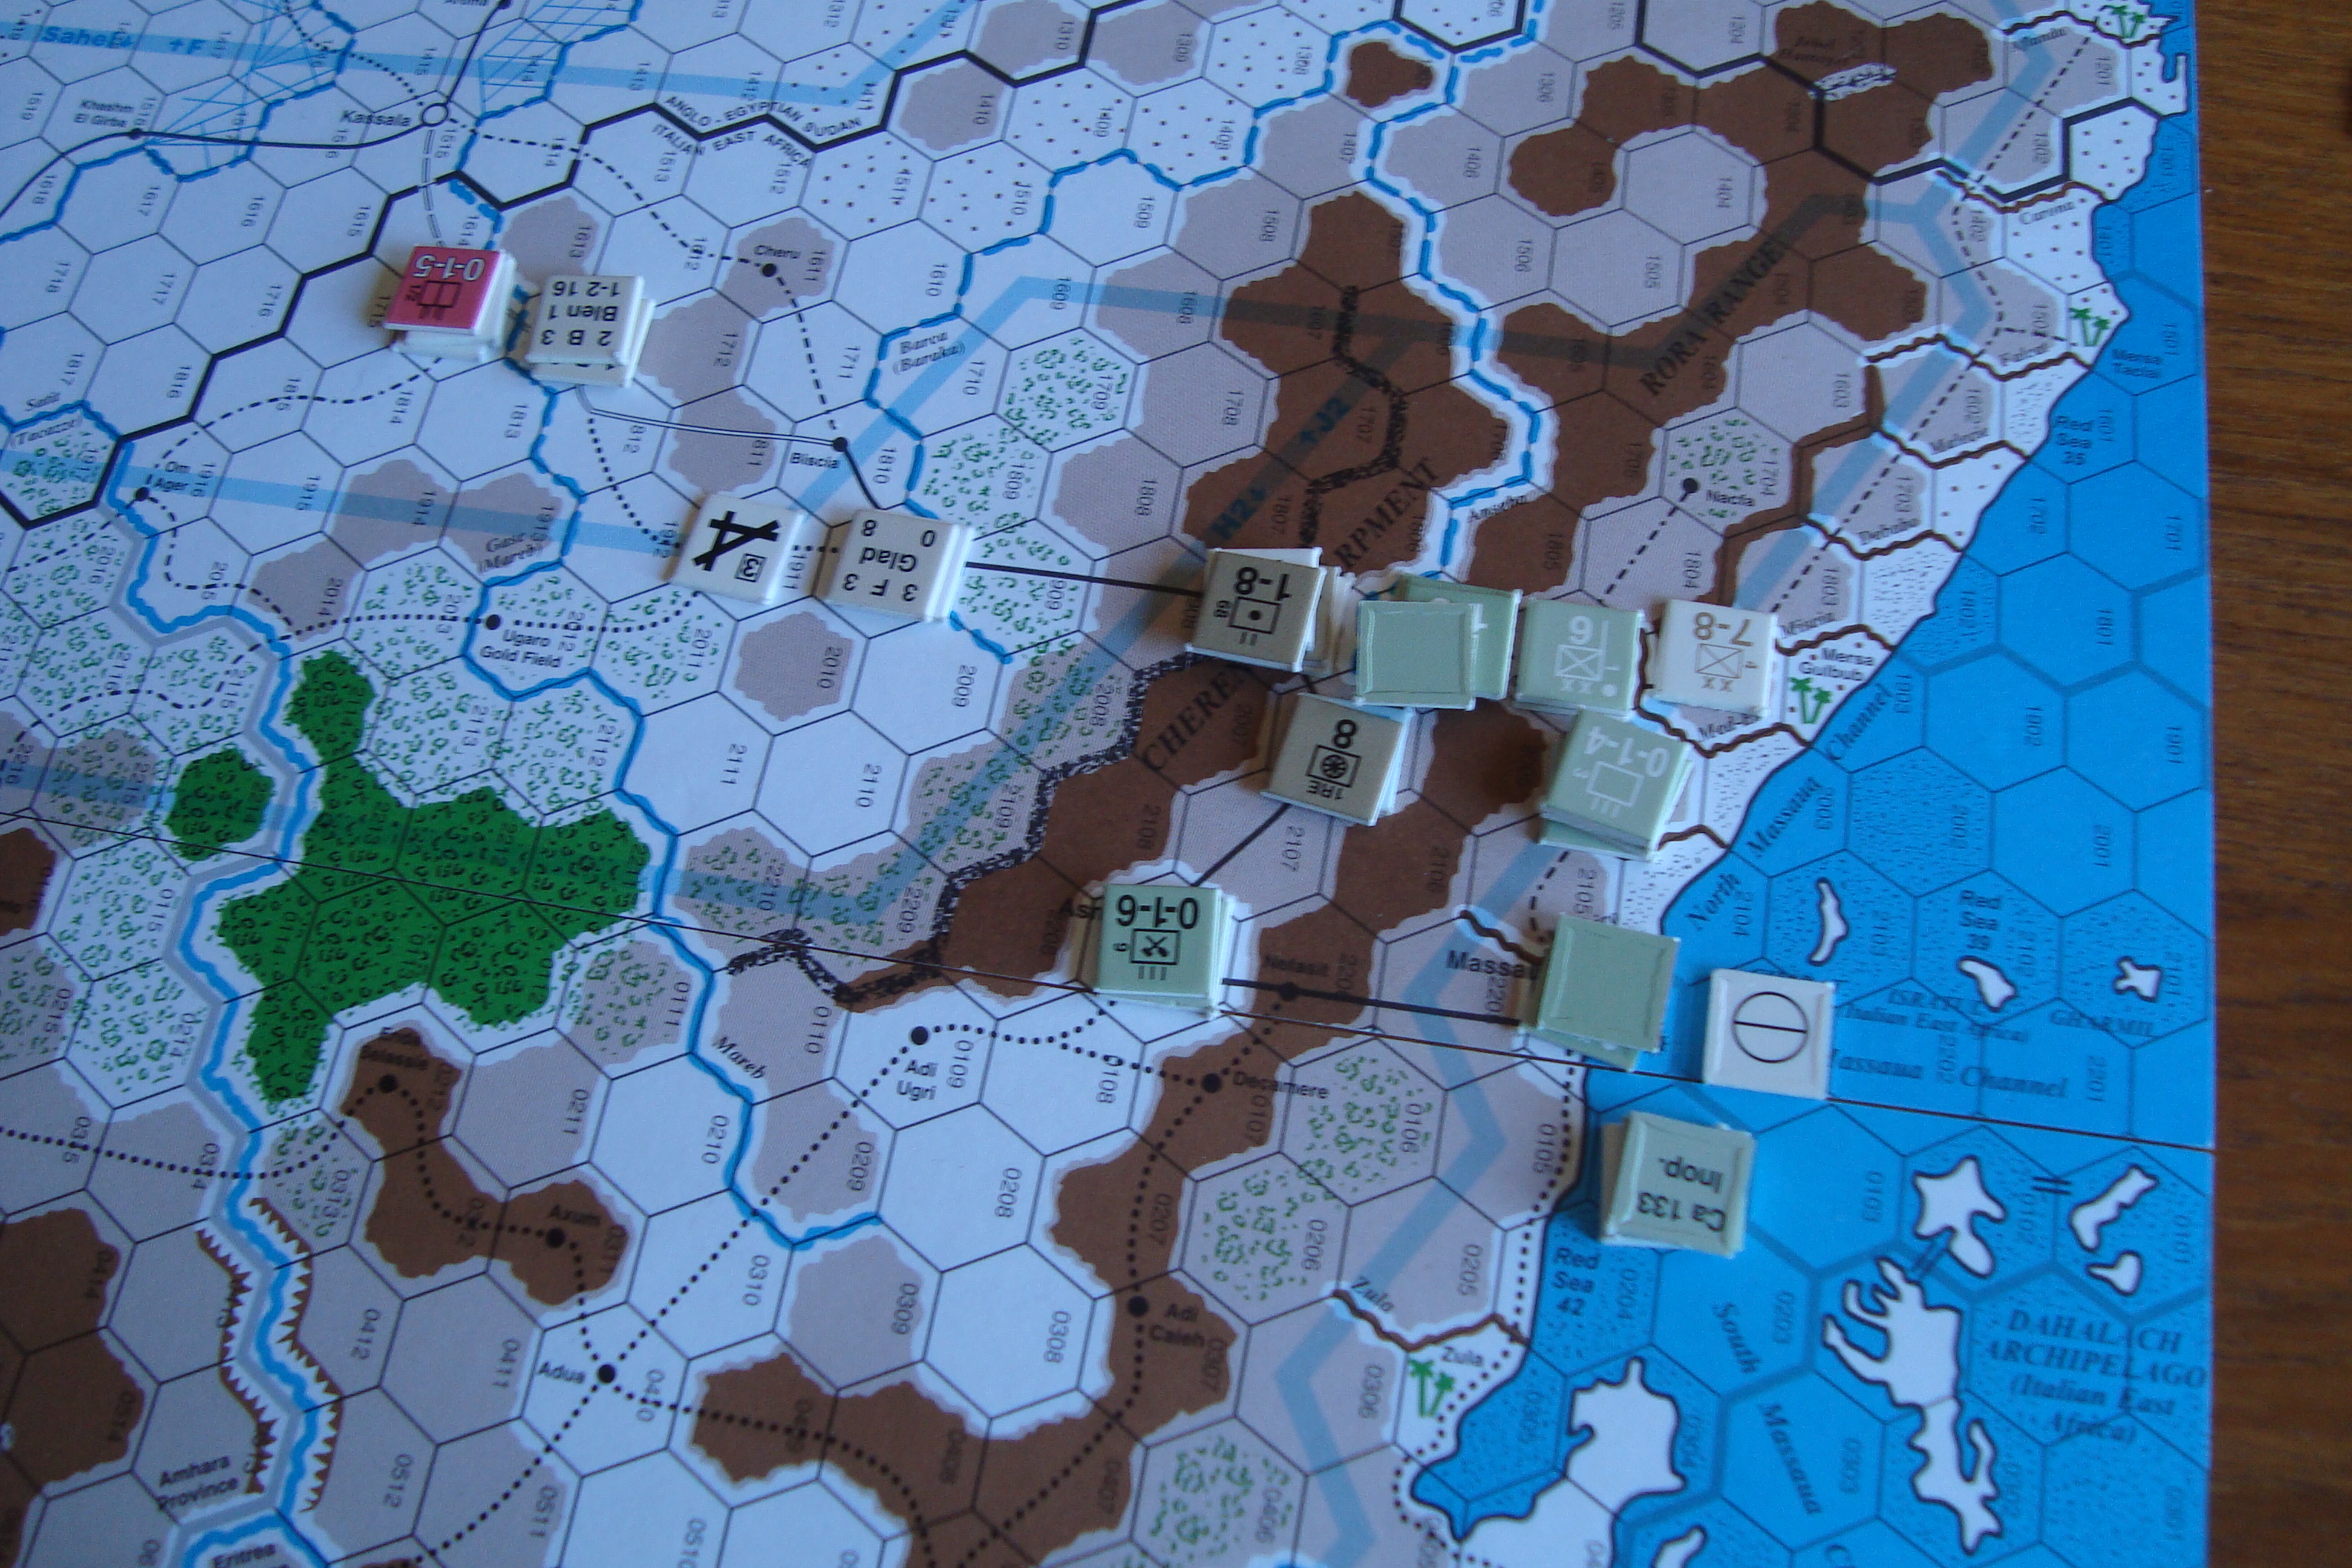
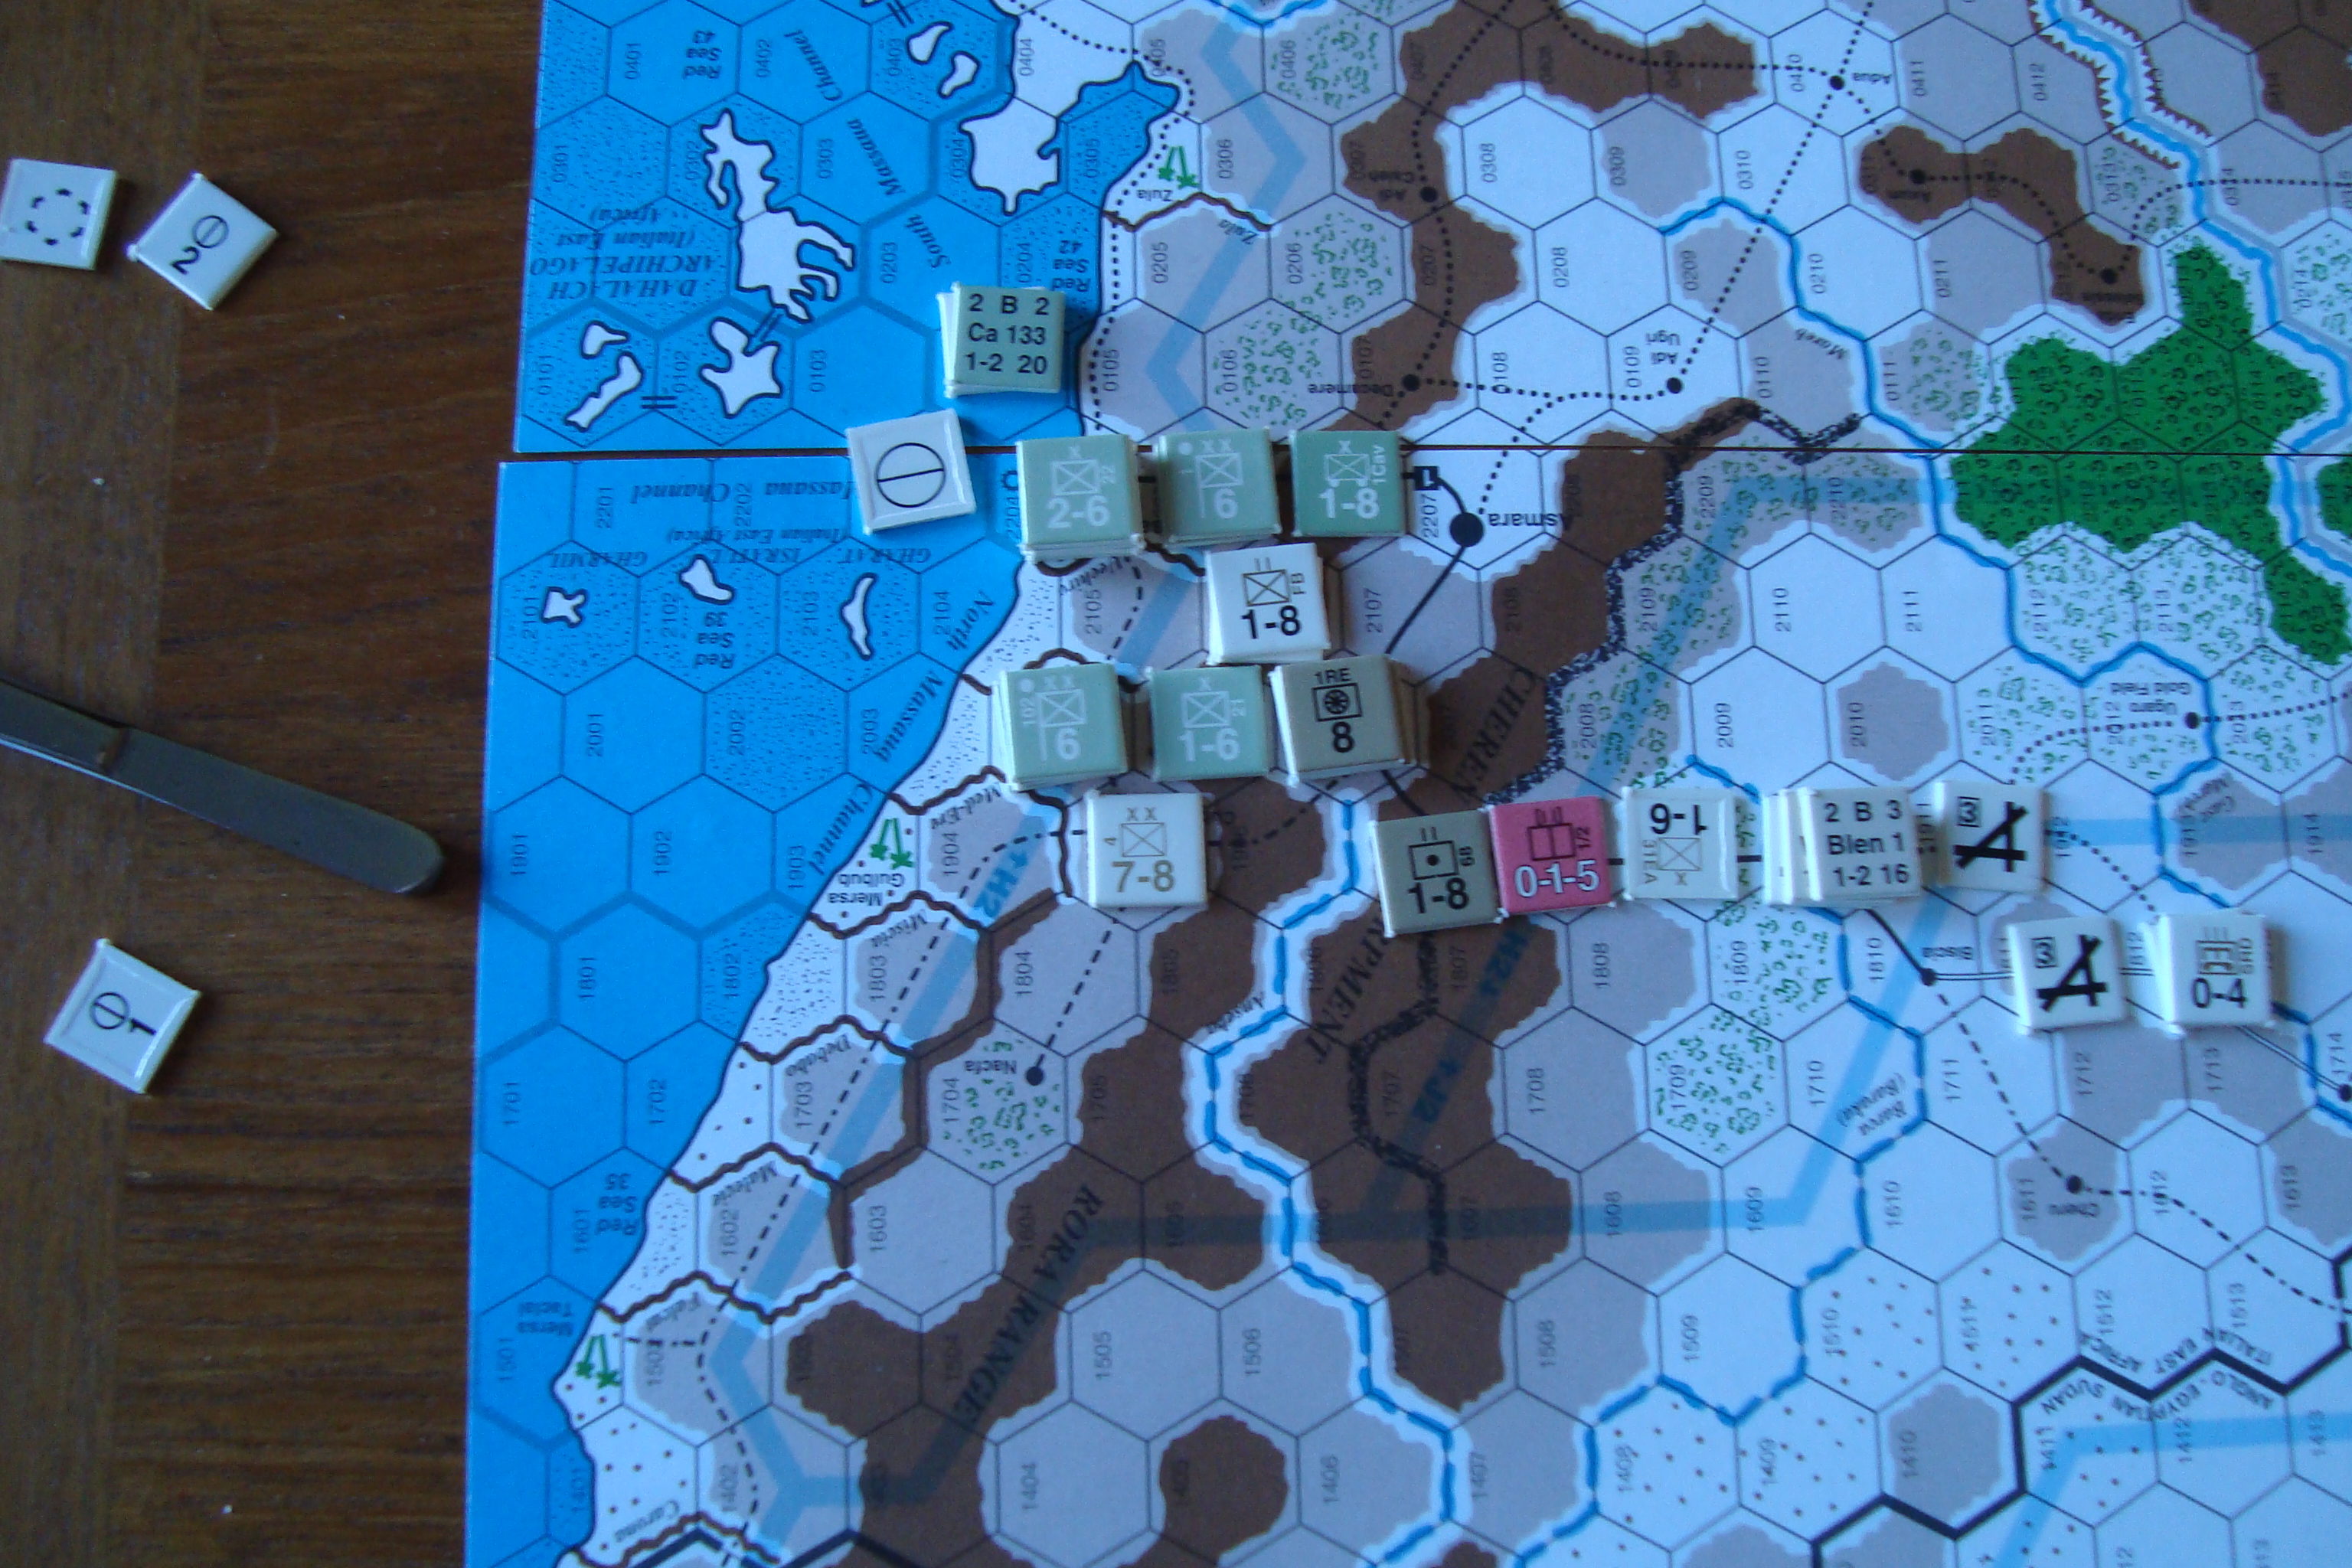
Allies:  South Africans advance from Kenya in the south, with air units destroying a SM-79 I had unwisely deployed at a forward air field.  Advances from Khartoum in the north southwards towards Kassala-Bascia-Massaula.

Axis:  Consolidate scattered units in the vicinity of Kassala using HQs.

Dec II – Clear

Allies:  Continue Kenya advance.  Defeat Italian force at Kassala.

Axis:  Retreat from Kassala to Bascia.

Jan I 1941 – Clear

Allies:  Continue advance from Kenya in the south.  Defeat Axis regiments holding vicinity of Bascia in the north,  using motorized machine gun battalions to envelope for ZOC kill.  Indian 4th Division advances south along coast from Port Saud.

Axis:  Counter-attacks and destroys motorized machine gun battalions.  Retreats east to mountains near Massaula.

Jan II – Clear

Allies:  Advance along coast from Kenya, takes Mogadishu with amphibious assault.  In the North, 4th Division continues advance shrugging off (over running) delaying Italian regiments.

Axis:  Withdraws southern and eastern forces north towards Addis Ababa.  Forms hasty defensive positions around Massaula.  Air strike against British airfields unsuccessful.

Feb I – Clear

Allies:  Takes Keren (key to breaching mountain defenses outside Massaula) on a half-exchange.  Advances towards Addis Ababa.

Axis:  Continues to withdraw towards Massaula, but hampered by British ZOCs.

South Africans Advance Towards Addis Ababa (Upper Right).

Feb II – Mud

Allies:  Consolidate near Keren.  South Africans now slog in mud towards Addis Ababa.

Axis:  Establish defense around Massaula, continues to move/consolidate units near Addis Ababa.


British Begin Assault On Massalua Defenders After Capturing Keren.  Flipped Italian Units Are Out Of Supply,
British Begin Assault On Massalua Defenders After Capturing Keren. Flipped Italian Units Are Out Of Supply.

At this point , VIPs were tallied, with each side having two (2).

March I – Mud

Allies:  Launch assaults on Massaula perimeter defenses.  Slog in south continues.

Axis:  Now defending Massaula proper.

Final Defensive Perimeter For Massaula

March II – Mud

Allies:  Capture Massaula  (This will give them one (1) VIP), begin advance southwest towards Addis Abada.  South Africans continue slog.

Axis:  Forces in Addis Ababa deploy to forward defensive positions awaiting Allied advance.

April I – Mud (At this point Tim became understandably irritated by my uncanny ability to throw sixes.  I pointed out to him that this was better for him with a weather role than a combat roll).

Allies and Axis:  Same as March II.

At this point play stopped.  We were engrossed in the Notre Dame-Texas game, and it appeared that the game would continue for more turns than time remaining to play.

Comments to follow.

Tim’s Comments – 30 Years War GMT

Here they are….

Game notes, in no particular order:

  • You were much more aggressive in the second game.  In prior games, you would use either the Bavarians or the Imperials, but not usually them both at the same time.  Once you did, you were able to pick up a lot of territory.  Either one of those forces are pretty strong and together they are a lot for the Protestants to handle.
  • I don’t know if you saw it or not, but there is a rule that if all of the cities in an area are at level 2 devastation, the VP for that area drop by one.  It seems like a rule that wouldn’t come into play much, but both Saxony and Brandenburg might have lost VIPs in the last game.  We rolled poorly for recovery and by the end of the game, central Germany was a howling wasteland.
  • I was a little gun shy with the Swedes.  I had lost pretty much all of my other armies and leaders, so I didn’t want to get Gustavus killed in battle….Man, if I’d only had one more turn!
  • I probably should have been more aggressive against the Spanish and tried to attrit them down a little bit, so they couldn’t clobber the French.  I thought about moving the army in the Netherlands out, but events always worked against it.
  • It occurs to me that I didn’t make particularly good use of my fortresses (it didn’t help that you rolled very well on your siege combats). I wonder if garrisoning them would force you to leave armies in place, rather than moving back to base areas at the end of the turn.  Anything that slows down the Imperials in the early part of the game is worth trying…

Been A While – 30 Years War GMT

Note:  This was drafted last Friday morning, but due to sloth not posted until today.

Finally back from a month of travel.

With Tim arriving later today for a game of Wavell’s War East African Campaign, I need to post up about our mid-August 30 Years War game.  Tim took the Protestants, and I had the Catholics.

We played a few turns Friday afternoon/evening to re-familiarize ourselves.  Lucky for me, we reset for a Saturday game.  My play on Friday can best be described as cautious and inadequate.

Friday’s experience reinforced the lessons from our previous game.  These were 1) Secure electorates for VIPs,  2)  Recruit whenever possible 3) Try to pay as many of your forces as possible, rather than rolling for desertion, 4) Larger stacks of units are very effective and 5) The pillaging effects of movement can render large parts of the playing area almost untenable.

Both Lessons 2 and 3 involve the use of at least two cards per turn, leaving a maximum of four cards for operations.  The Early War card deck has a large number of event cards, so the operational options are limited.

Play on Saturday had a good pace and tempo.  Both of us adhered to the lessons learned.

By Turn Three I had  been able to use my Spaniards (west of map, yellow counters) to secure the regions within their permitted area of operations.

Turn 3

By Turn 6, I had pushed Tim out of Hungary and advanced into the Palantine regions.  France entered the war by Turn 8, pinning down my Spanish forces, with Tim’s Danes representing a threat from the North.  Some electorates changed hands, but neither side could control the number required (all of them) to score significant VIPs.

photo1

I was very active with the Bavarian Forces (Blue counters in South).  They took a beating, being wiped out and reconstituted twice.  I was less aggressive with my Imperial veteran troops, taking losses from mercenaries.  I rarely recruited militia.

Both sides used large stacks.  Tim was especially adept at moving rapidly to destroy isolated units.

By game’s end Lesson 5 held true.  Literally every province was devastated.  Unfortunately, I did not take a photo of this.

The game’s last turn ended with a  climatic battle between Imperial troops and Gustavus’ Swedes.  Tim scored a tactical victory, but both sides were substantially reduced in size.

This is a good game that requires more than one playing to appreciate.  Not as involved and mind numbing as Pursuit of Glory, but with far more nuance than Paths of Glory.  We’ll put it on the table again.


Renaissance Skirmish – Actions

Played a repeat of the mounted scenario last night, incorporating the new thoughts on rules and use of dice to guide play.

Added “Quality” as a troop attribute, using “Excellent”, “Good”, “Average” and “Poor”.  These classifications were assigned probability percentages of 75, 60, 50, and 40 percent, respectively.   I also rolled a D4 to see how many individuals might have qualities that differed from the group. Another D4 to determine what that might  be, with a roll of “4” being “Excellent”, a “3”, “Good” etc.

Final “Yes”, “No” roll was for awareness, which effected the ability to react in the first few turns of the game.

Turn 1:  Blue had initiative, but was unaware, so Red entered at a trot.

Turn 2:  Blue again had the initiative, became aware, with crossbowman moving to the road to shoot. Red accelerated to a gallop and entered into melee with the crossbowmen, with one bowman killed, and the other locked in melee with Red’s leader.

Turn 3:  Death of the bowman did not effect Blue’s fear rating.  Blue troops charged out of the house, surrounding the Red troopers.  However, the troopers (excepting the leader locked in melee), simply charged through the swarm of their assailants.  Red leader killed the other crossbowman.

Turn 4:  Death of the second bowman increased Blue’s fear rating.  Still having the initiative, Blue fled into the woods.

In retrospect, it was a bad move to move the crossbowman to the road.  Should have waited.  Still a quick and fun scenario.  Another run-through tonight.  Here’s a few photos.

Red Surrounded.  Note Identification Colors On Rear Of Cavalry.
Red Surrounded. Note Identification Colors On Rear Of Cavalry.
Blue Troops Swarm Out of House
Red Leader In Melee
Red Troopers Gallop Past Assailants.  Leader Still Locked In Melee
Red Troopers Gallop Past Assailants. Leader Still Locked In Melee


Renaissance Skirmish – Encounter Scenario

Thunderstorm activity forced the cancellation of today’s lake fishing expedition. So, up at 0530 with nowhere to go.

Gloomy, rainy weather was the perfect motivation to start working on the Renaissance Skirmish rules and scenarios.

Set up an encounter scenario using the same forces as last game, but with only a small building at a crossroads. I added an on-foot leader for Red, and a mounted leader for Blue.

Really had to resist promiscuously adding chrome to the On The Seven Seas rules. However, given the scenario, I had to use something for sight and spotting. Used 24 inches for unobstructed sighting, 12 inches into brush/rough and six inches into heavy cover (woods/forests). Roll for spotting at end of turn. Once within range, use the trusty Y/N/M dice to find out result. Once again, if result was a “Maybe”, then percentile dice above 50 percent for “Yes”, under for “No”.

For shooting, a D10 of 10 was a kill. Saving throw per RAW only if in cover or wearing armor.

Both Red and Blue forces assigned Greed and Fear ratings of 7 and 6, respectively. Rolled for alertness, and neither side was alert. This meant administrative formations moving down the road. Red from the North, Blue from the South. Red has three Arquebusiers, with Blue having three Crossbowmen.

Turn 1: Both sides move down the road.

Unaware Of What Lies Ahead, Both Forces Advance Towards The Crossroads.  Blue in Foreground (South)
Unaware Of What Lies Ahead, Both Forces Advance Towards The Crossroads. Blue in Foreground (South)

Turn 2: Both sides move down the road. Red sights Blue.

Red Sights Blue And Takes Cover

Turn 3: Red has I (Initiative). Red takes cover, Blue moves down the road.

Red In Ambush Positions

Turn 4: Blue has I, moves down the road. Red Arquebusiers move into firing ambush position.

Turn 5: Red has I, lies chilly. Blue sends two men to loot the house, remainder keep moving down the road.

Turn 6: Red has I. Stays in ambush position, Blue moves (luckily) just outside of firing range (6 inches for Arquebusiers).

Blue Moves Towards The Kill Zone

Turn 7: Red has I. This is very bad luck since they cannot shoot at Blue, and Blue can move within 6 inches and potentially spot the Red ambush, before being shot at. And, of course, Blue moves in and spots.

Turn 8: Red has I. Both sides exchange fire. No hits. Red moves into melee. Blue loses a Crossbowman and Swordsman. Red loses a Two-Handed Swordsman.

Initial Melee
Initial Melee

Turn 9: Blue rolls D10 four times (one each for casualties, two for ambush), no change in Fear rating! Red rolls once, no change. Blue has I. Melee continues as more Blues join the fray. Blue looters move out of the house advancing towards the melee. Blue loses one Swordsman.

Takes Casualties And Pushed Back
Blue Takes Casualties And Pushed Back

Turn 10: No change in Blue fear. Looters and Blue Leader join the melee. Blue Crossbowmen kill a Red Halbadier, and (with saving throw) force a Red Arquebusier back into the cover of the woods.

Blue Leader Joins The Fray

Turn 11: Red fear increases by one. Shooting ineffective. Red leader joins melee. No casualties.

Red Leader Fighting, Blue Gaining Upper Hand

Shut it down at this point because it will be nothing but a Dice Fest. Blue has survived the ambush and it more than holding its own in the melee. So, what mechanism to break off contact?

 Will run the same scenario again, but add rules for running, horse galloping, and use of pistol in melee. Have to consider the ineffectiveness of shooting despite the two “tens” rolled in Turn 10. Also, some type of reaction to orders/situations might be needed.

 Regardless, a fun and quick game.

Renaissance Skirmish – Moves 1-10

Finally started playing the game.

Scenario involved an attack on the village. Directional Die (DD) indicated the attack was to come from the Northeast, with the “Yes, No, Maybe” die (YNM) roll indicating the Defenders were not alert (If the result is a “Maybe”, I use two percentage dice, with result of 51% or more a “Yes”). This allowed the Attackers to move within 6 inches of the first building before another spotting attempt could be made.

Both sides had Greed and Fear ratings of 7, each. Rules As Written (RAW) state highest Greed has movement initiative, if tied roll for initiative.   I decided to let the Attackers have the initiative until the turn after they were spotted, then work with RAW.

The Attackers included ten troops, three of which were armed with arquebuses. The Defenders totaled eight soldiers, three of which were armed with crossbows. Each soldier was assigned a number for identification and, in the case of the Defenders, which building they would occupy.

The game sequence is Spotting/Morale Check, Shooting, Movement, Melee.

Turn 1: Three attacking scouts moved to within 6 inches of the northern two-story house. Not spotted.

Turn 2: Scouts move to within 2 inches of the house. Spotted. Rolled 4-sided die to determine how many Defenders were in the house. Roll was for two defenders. Die roll indicated Defenders 1 and 3 (cutting weapons, one with pistol), and a YNM roll for each placed them both on the second floor.

Turn 3: Two Scouts enter house, Defender fires and misses with pistol.

Turn 4: One Scout moves upstairs, engages Defender. Draw.

Turn 5: Another Scout moves upstairs. Both Defenders engaged. One Attacker falls back, one Defender killed.

Turn 6: No change in Fear Level due to death of Defender. Main Body of attackers spotted by occupants of North single story building. Die roll results in it being defended by two Crossbowmen. Main Body advances after being signaled by Scout outside of two-story building. Melee continues in two-story house with both Attackers ganging up on the remaining swordsman. Defender is killed.

Turn 7-10: Defenders Fear Level increases by one due to death. Main Body continues to advance into the two-story house , with crossbowmen denied opportunity to shoot due to blocked line of site. Attacking arquebusiers occupy second floor.

Turn 11: Firefight between Arquebusiers and Crossbowmen. Realize nobody can make a hit because a D10 result of 10 is needed, and the houses have a minus modifier of two due to cover. Four Attackers move into single-story house. Engage defenders in melee. One Defender killed.

Turn 12: No change in Fear Level. Remaining four Defenders occupy West Two-Story House, with two in upper floor.  Melee in single-story house continues. One Defender killed.

I stopped at this point and pondered the ineffectiveness of shooting. The quick fix is to make a D10 roll of 10 an automatic kill (no saving throws as per RAW). A D10 roll of 9 is a hit, with saving throw as per RAW (cover or armor). Shooter receives a +2 D10 mod if target is stationary. Will see how this works.


With North Two-Story Building Reported Secure, Attacker Main Body Advances.


Attackers Occupy Second Floor of North Two-Story Building


Attackers Ready To Assault One-Story House (on right)
Attackers Ready To Assault Single-Story House (on right)


With Two Buildings Captured, Defenders In East Two-Story Building Await the Onslaught.
With Two Buildings Captured, Defenders In West Two-Story Building Await the Onslaught.

Renaissance Skirmish – Basics

Set up the table for a skirmish game using the “On The Seven Seas” rules by Osprey.  Yes, I know, these are pirate rules.  But, when I purchased these rules, Osprey’s latest and period applicable offering “En Garde,” was not available.  While the reception for “Seven Seas” has been mixed, I do like the faction/greed/fear mechanics, and the simplicity.  We’ll see how they work on the table.

The game will be a village fight between two factions.  One will hold the village, the other intending to loot and plunder.

I’m using houses from Hobby Lobby.  These are cardboard and very close to scale for my larger Warhammer Empire figures.  More on them in a followup post.  I kept the four houses a neutral gray, with only red chimneys and add-on flower basins for color.

I’ll use a few figures and push through a quick couple of turns this PM.

DSC01497DSC01498DSC01490

Thirty Years War – Tim’s Take

Here are Tim’s observations.  Lots of great insights.

A few thoughts about the game, in no particular order.
I wish I’d found that chart with the nationalities information during the game and not afterwards…

We had made a few mistakes including: the imperials can’t recruit in Bavaria and the Danes go home if Christian is killed (which he was during his first battle).

There was a different chart that went over the foraging rules– I know I forgot that units removed due to foraging losses are out of the game…oops.

Those LOC rules are pretty important. Without them, armies are free to go pretty much wherever they please. With them, protecting bases becomes much more important, especially for the protestants since their big advantage in the early game is that they can pay most of their units.

 
You remarked more than once that it is hard to get a good handle for what strategy each side should use in the game. I think both sides should concentrate on grabbing electorates, which pay off big in victory points.

 
I think in the early game the protestants are just trying to stay alive, although I had pretty good luck in grabbing saxony. I think the Imperials should move hard into Bohemia. When you tried that in the last game, I wasn’t able to stop you.

 
I had mixed luck in getting armies to the Netherlands. Most of the ways of getting their involve moving through neutral territory, with the loss of victory points or through the lower palatinate (aka the valley of death). As long as the spanish are on the map in force, its probably better to move through neutral territory. I guess it goes without saying that knowing whether a particular city is or isn’t in the Spanish zone is pretty important…minor details like that can have a major impact on game play.