Doubleheader

She’s away with the trailer this weekend and my salmon hunting expedition postponed (the biomass has not moved into the Columbia yet), so I’ve set up two games on the dining room table.

The first is another try at the Luzon Scenario from The Damned Die Hard (TDDH).  The second is an old Europa Magazine scenario, Operation Icarus.

I found a nice TDDH series replay at a fellow Oregonian’s site.

The Icarus scenario is one that I’ve played before.  As Hitler is quoted in The Eagle Has Landed, it’s a “simple matter of logistics”.  How to get German units from Norway to Iceland, repair ports, build airfields, resupply what units you have, and, yeah…….stop the British.  If only I had one more para unit!

I’ll post a session(s) report later on.

New-Old Project

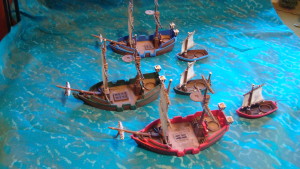
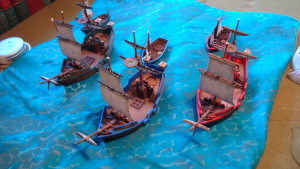
For reasons I still can’t fathom (no pun here), I decided to finish off my sailing ship project.  As with most everything else, its genesis occurred somewhere in the distant past, in this case as an adjunct to my East African Renaissance project.    After all, a coastal campaign should have ships.

I already had a couple of the old “Limeys and Slimeys” ships, but fabricating and fitting the various bits and sails needed to give the hulls some semblance of realism was just too difficult.

Some time ago, I found a Weapons and Warrior Pirate Battle Game that looked promising.  This Pressman kit boasts having “over 100 pieces.”  It came with plastic pirates (worthless), two ships, two pinnaces, a fort,  a small stockade (semi-worthless), along with cannons and mortars (all too large, and therefore worthless). Everything (except ships) was designed to explode if hit with cannon shot from the oversize guns.  While 17th century vessels, they are close enough to the period and had the advantage of fully rigged plastic sails.  The ships can be used with both 15mm and 25mm figures.

Not content with one box, I later bought another.  Both languished in The Shed for a few years.

I started painting one of the ships last Fall.   Things did not go smoothly.  I just couldn’t get the hull colors right, and must have primed and re-primed the damn thing four times.  Finally, things came together and, with the help of some photos of others’ work found on the net, I finished one.  The second followed shortly thereafter.

DSC01168`

Here’s the basic hull out of the box, along with a hull that I literally ripped the deck “prongs” from, and put down new decking.  While it looks bad, when painted and with a grate added, it works quite well.

DSC01160

Speaking of painted, the next bad photo shows the rough first coats of my latest efforts.  This will be “Red Boat”.  The others are green and blue.  I just slop the paint on at this point, especially red.  For some reason, red has never covered well.  Not even when ingesting PBR.  I’ll use crimson for the second coat.

DSC01167

Hopefully, this one will be finished off in a week or so – multiple projects going on.  The fourth boat will be a little problematic since it is missing some important bits.

Who Are Those Guys?

KC SOA

Well, they’re the Kansas City Chapter of the Society of Ancients circa 1983.  Quite a crew.  I can remember a few names, and have a foggy notion of others.  I’d mention a few, but have a great fear of internet photo liability.

The locus was Yankee Doodle Game and Hobby in Grandview.  Great shop.  Lots of miniatures and a good selection of board games.  But he had to make a living, so there were lots of D&D items.  I won’t discuss that clientele.

The shop was a clubhouse.  You could always go down and hang out.  Scott (owner) would be up front at the cash register, painting (helluva painter) and holding court.

I was snookered into buying a mound of half-painted MiniFig Dacians.  This army needs an experienced, sophisticated tactician.  That was not me.   The other players had either Romans, Byzantines or Steppe Nomads.  The Dacians never had a chance, not even when I figured out that I needed to get lucky and get lots and lots of woods.

There was a really big table in back.  Maybe 12×8.  On selected Saturday evenings the chosen few would have big English Civil War games with hundreds of Hinchcliffe figures.  The table looked just like something out of the (then) newly published Miniature Wargames magazine.  These games would start at closing time, and end well after midnight.  Lots of beer, pizza, and fun.

It was a fantastic introduction to miniature wargaming.

The Damned Die Hard

Tim and I decided our next FTF game will be a scenario from War of Resistance (WOR), one of two games in HMS/GRD’s Glory series.

I have both games, so he took the rules for WOR, and I set up the Luzon scenario from The Damned Die Hard (TDDH).  Interesting scenario, with the US player having to decide where to defend against a relatively strong but disorganized Japanese invasion force that is already ashore, and then a fighting withdrawal further south through terrain that is no easily defended.  To make things tougher, the Japanese have air supremacy.

As the British say, “All battles occur at the junction of two maps”, and this game is not an exception.  The break between the two map sheets is right across the best initial line of defense.  I’m going to get copies made and scotch tape the damn things together.

The unit sizes are small – battalions, reduced battalions, and regiments.  ZOCs are reduced for many units, and the smaller artillery units can only support one Regimental Equivalent (RE).   Special rules for jungle, and jungle rough terrain that provide the Japanese with some real advantages, as well as exploitation movement for light infantry and certain infantry units based on their intrinsic movement factors.  So, while it looks like Europa, it isn’t Europa. Closest Europa comparison I can come up with is Winter War. The similarities that come to mind are small  unit size , ZOC limitations, and special terrain features having a real effect on play.

Here’s the link for the WOR designer notes.  These notes are detailed, and give a good feel for the rules.

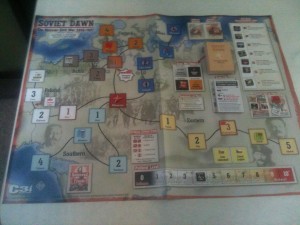
Company’s coming over so I had to take the game down.  Here’s a picture of the Dec IV turn after the Japanese pushed through the initial US MLR.

DSC01159

Seems like a fun game, and I am looking forward to setting it up again late this week.

Europa: Battle Of The Bulge Scenario

Finally getting around to posting up about last weekend’s Europa game.  It was a hard-fought contest, coming down to the last impulse.  The scenario uses a modified Europa turn sequence, with a non-phasing reaction phase placed between the phasing player’s movement and exploitation phase.  It’s air-on-demand, regardless of impulse.  The scenario involved the Dec I  through Jan II turns.

Victory points are awarded to the German player if able to exit units off the North map side (Brussels/Antwerp), or if the Allied player activates either the 9th or 3rd Armies.  For the Allied player, it’s simply a matter of avoiding German VPs.   We did not play the Boddenplatte option – which also involves VPs. Too much for the time available.

Tim’s axis of advance was South to North, using high-odds armored attacks to shatter outlying US units.  As Allied commander, I decided to activate either the 9th and/or 3d Army only as a last resort, way too many VPs involved.  The Allied reinforcement schedule is fairly generous, and it looked as though it was worth the risk to attempt a bend-but-not-break defense.

By mid-game, Tim’s pressure forced me to abandon Aachen in order to shorten up my defensive line, in order to create minimal reserves if needed to plug gaps of support weakened units.  The modified turn sequence saved me.  His January I attack attrited my unsupported southern units, forcing them to fall back.  However, during the reaction phase, I was able to reinforce these faltering units and seal off a penetration that would have given him access to the road grid leading to Brussels and Antwerp, and victory.

Early last week, Tim sent me an e-mail summarizing his impressions of the game.  Here they are…..

  1.   We forgot to halve the bombing factors of aircraft during the snow weather turns….oops…one for your rules screw-up files. We’d even talked about it during the set up.
  2. I wonder if it would be more useful to have the Luftwaffe fly harassment. They did help some on the attacks, but if they’d been halved, they wouldn’t have been all that useful (of course, they’d be halved for harassment, too). Making it harder for the allies to move up reserves would be a very good thing.
  3. I didn’t do a very good job of handling negative modifiers– I should have been a more cognizant of whether a defending stack was capable of AECD and if it wasn’t, used enough infantry to bring the attack below the threshold for ATEC. ATEC is very hard to overcome during bad weather. Of course, using more infantry lowers the German combat power. The other option, which I did use later in the scenario was to throw in more half capable units (I guess the Germans knew what they were doing when they made their panzer divisions into panzergrenadier divisions by detaching the panther battalions).
  4. I know we talked about it, but I was really surprised when you gave up Aachen. I was thinking that the allies would be very reluctant to abandon the first German city they’d captured and a west wall hex to boot. Given that the scenario didn’t penalize that decision, it was a good one.
  5. It was a bummer that my commandos got killed…I was hoping they would negate some of the negative modifiers from terrain and weather.
  6. I think I spent too much energy attacking the weak southern part of your line. I like to think I’m pretty good about focusing about what wins a scenario or a game, but not this time. In better weather, I might have been able to turn your flank, but its hard in the snow (and the axis fuel shortages hurt, too).
  7. I think you’re right that the Germans have to take some low odds attacks in order to try to crack the allied line.

BTW, the game involves a lot of counters in a very small area.  Tim liked that.  We did not use the black and white larger hex insert that accompanying the magazine.  Here’s the usual crummy picture, shot early in the day, so the beer mats are not yet in use.


DSC01158

Fun game, Fun Time…….

War In The Aegean Review

I’m going to use the criteria cited in a previous post and published by “Lloyd”.   Please read his article for insights concerning the criteria.

Decisions:  Not much flexibility for the commanders.  The VP schedule makes it very clear what has to be done, and the game mechanics concerning Rhodes takes the decision to invade out of the hands of the commander.  However, the coordination of air and naval units is very demanding and interesting.

History:  Both commanders are faced with the same operational problems as their historical counterparts.  Both commanders have to “do a lot” with very little.

Luck:  Plenty of that here with the variable number of impulses per turn, random day or night impulses, spotting, Luftwaffe availability, and Rhodes invasion die roll.  The German commander needs lots of it in order to shepard his combat units across the Aegean.  The Royal Navy needs the right die rolls in order to locate the invasion flotillas.

Atmosphere:  It’s a tense game.

Mastery:  Fairly easy to learn, and it took several replays to get the feel of coordinating air and naval forces.  On the other hand, you can do everything “right” and still lose because of the Luck factor.

Tweaks:  It’s a fairly comprehensive set of rules.  I tweaked it to reduce the number of impulses per turn, messed around with the sighting die roll, and Luftwaffe availability.  The solitaire task force rules – which I didn’t use – are very tweakable.

Abstraction:  Really not much.  Everything that was going on was going on, on the map (wow, what a sentence!).

Clarity:  Good.  However, I never figured out if early task force/naval units could all return.

Comprehensive:  Very good.  Lots of charts reduce the need to consult the rules.

Speed:  Fairly slow.  Even with low counter density, the joint operations involved made each impulse take some time.

Scenarios:  Not much flexibility at all.  The campaign game, with or without Rhodes.  That’s it.

Summary:  I enjoyed playing this game.  It took a lot of time due to the variable impulses, which I eventually capped at three per turn, spotting rolls, and need to think through each move.  The game definately grew on me, and I was intrigued by the operational problems faced by both commanders.  It’s very playable solitaire, but I think it would move more quickly with two players because the game dynamics are so fatiguing without a break.


Wargaming Weekend

My great friend Tim drove out from Portland on Friday for a short weekend of wargaming.  We hadn’t played Europa in ages so it had been agreed some weeks before to try a Battle of the Bulge scenario published in Europa Magazine.  More on that game in a separate post.

I met Tim back in 1998, just after moving to Portland.  Our meeting was prompted by my post in the old Lysator Europa discussion group about FTF opponents in Portland.

After two “get acquainted” meetings in brewpubs, we started playing Europa on a weekly basis.  Lots of games, lots of scenarios.  By our count we’ve played War In The Desert at least 4 times,  (by my reckoning the horrific) For Whom The Bell Tolls a couple of times, who knows how many tries at Second Front, including an epic 1943 Sledgehammer scenario (those P-40s just don’t get the job done….give me a P-47 every time) that made Dieppe look like a smashing success.  I can’t even guess at how many times we played Narvik, Balkan Front,  and Winter War.

We even played Second Front at GameStorm twice.  The first  time Tim invited a couple of players from his Newberg Saturday wargaming group to participate.  These gentlemen apparently expected some sort of preparation, order and discipline when it came to the setup.  According to Tim, they never recovered from the shock of watching me nonchalantly dumping a mass of  counters out of the box onto our assigned table.  I figured with four sets of hands and eyes, setup would be a snap.  Suffice to say it was not the most congenial of games after that.  I melted down on Sunday of our second appearance after our studious next door neighbors were replaced by  a group of children playing some type of miniature skittle bowling game, complete with screaming.  Words were exchanged.

By 2010,  Tim and I started playing GMT published card driven games.  Our favorites are Paths of Glory, Pursuit of Glory, Wilderness War and Thirty Years War.  This trend continued when I moved because it is damn near impossible to finish a Europa game in a couple of days.

One reason for this is that we don’t necessarily focus on the game all the time.  Lots of talking about current events, past games, horrendous die rolls, beer drinking, DVDs and (in season) football watching.

But no mistake about this,  Tim is an extremely skilled and focused player.  Much more so than I am.  He’s a Europa Experten who has gradually (and there have been years over which to do this) come to terms with the demise of that franchise, and HMS/GRD’s inability to deliver their remake of Scorched Earth; Total War.  Tim is happiest when playing games with very high counter density, so this game has been his Holy Grail.  Not even March To Victory has satisfied his need for towering stacks of counters.

I’m looking forward to our next meeting.

War In The Aegean Redux Redux (Turn 5)

Well, kind of Turn 5.  Started up pre-turn sequence.  Rolled for day turn with only one impulse.  British had initiative, and then rolled to see of ACCOLADE (Invasion of Rhodes) would happen.  Rolled a one, so it will happen.

At this point I realized that I had spent way to much time on this game, and that I had to get ready for the arrival of my friend Tim, and an intensive Day+ of Europa.  So, I packed the game up.

I’ll post up what might pass for a review later.   Found this interesting discussion on the web and will use it as the basis for my review.  I’ll also correct that mutant picture I posted up yesterday.

War In The Aegean Redux Redux (Turns 3 & 4)

Turn 3 is for one impulse, only.  It’s a Day Impulse, with Axis initiative.  German transports and landing craft embark from Greece and Crete, steaming towards the islands, stopping just outside of British naval range.  German airdrops on Kos and the port in Kalimnos are successful.  British air units are able to identify some of the German convoys, but the USAAF bombing of the parachutists are ineffective.  The British refused to attack the convoys piecemeal, choosing to saturate specific convoys with landing craft on the next turn.

Starting out Turn 4 (with three impulses), the British, anticipating German initiative for the next impulse, have set up a CAP to protect their ships.  The Germans set up CAPs over their paratrooper units.  The roll is for German initiative, but a night turn!  How lucky can the Germans be?  Able to elude the intercepting British units, the Germans land on Kos.

British Naval Units With Combat Air Patrol In Position.....But The Germans Will Elude Them Due To Night/Initiative DR
British Naval Units With Combat Air Patrol In Position…..But The Germans Will Elude Them Due To Night/Initiative DR

The British naval units pursue, and attempt to spot and engage the Germans steaming towards the harbor at Kalimnos.  This task force is comprised of transports, which can only embark troops in ports.  But, all three contact attempts fail!

British Surface Units Attempt To Locate Axis Invaders...Without Success!
British Surface Units Attempt To Locate Axis Invaders…Without Success!

Germans now land in Kalimnos, and the Kos invaders push back British units defending the airfield at Kefalo.

In response, the British launched an all-out attack on the invaders, devastating the Axis shipping in Kalimnos harbor.  The Germans must gain the initiative next impulse in order to use their surviving landing craft to ferry troops from Kalimnos to Kos.

After Landings, The Germans Are Attacked By British Naval And Air Units

After Landings, The Germans Are Attacked By British Naval And Air Units

No such luck!  Although the final impulse is a night turn,  the British gain the initiative.  While a night bombing raid over Kefalo is unsuccessful, British naval units sink most, but not all, of the remaining landing craft and transports.  The Drache puts up a valiant fight, inflicting one hit on HMS Carlisle.  After their attacks, the British surface units use their remaining movement to take up NGF stations.

The two surviving German landing craft ferry troops from Kalimnos to Kos.  Torpedo boats finish off HMS Carlisle, but attacks elsewhere are unsuccessful.

War In The Aegean Redux Redux

Turns 3 and 4 were wild ones.  All kinds of maritime carnage.  Germans suffered some catastrophic landing craft losses due to very effective British Beaufort attacks – I think the CRT really favors both dive bombing and torpedo attacks.

However, I forgot some reinforcements which might have made a difference.  All that said, and with the number of operational errors on both sides, I’ve reset for the beginning of Turn 3.

Will start up later today.